
SOLD!

General Specs
- Year: 1978
- Make: Pontiac
- Model: Trans Am
- Mileage: 28,441 Exceeds
- Engine: 455 Built NOM
- Transmission: 5 Speed Tremec
- Exterior Color: Blue
- Interior Color: Grey/Black
- VIN: 2W87Z8L176511
Vehicle Description
CALL DAN AT 513-256-5543 WITH ANY QUESTIONS ON THIS VEHICLE
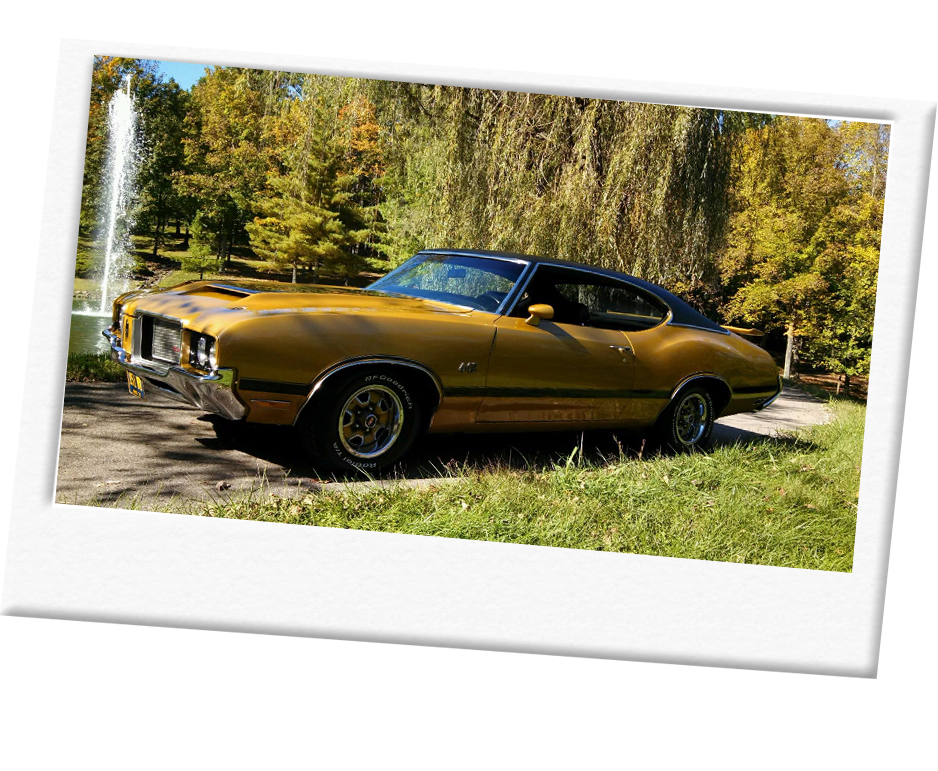
Cincy Classic Cars is proud to offer this 1978 Pontiac Trans Am Resto-Mod which has been fully restored and transformed over many years into the machine it now has become. This TA was owned by the previous owner for 29 years and was sold new in Texas then went to Arizona prior coming to Ohio. The former long term owner works for NASA and has spent countless hours creating this TA and did most of the work himself. His attention to detail and love for this car shows exponentially in every photo and video of this fantastic TA. He took the time to do complete write up of the work performed over the years on this special Trans AM, below you will find his write up in his words. I felt only he could tell this cars story.
This Trans Am was painted in Corvette Blue around 20 years ago and still shows very well. There is no rust anywhere and no bubbling paint or cracked paint around the car. The upgraded 455 Pontiac engine has been fully restored with numerous upgrades and he estimates HP to be conservatively around 450HP. The Tremec 5 Speed Transmission is wonderful to drive with the Eaton 3.73 rear gears. The underside is rust free and fully detailed and the suspension has been completely upgraded. Below is a comprehensive write up on this Amazing Pontiac Trans AM in the prior owners own words.
1978 Pontiac Trans-Am WS-6 400/4-speed
VIN 2W87Z8L176511
Purchased Nov, 1994
ENGINE:
1970 455 YH Block, 0.030″ overbore. Stock 455 N crank turned 0.010″ rods and mains.
Block deburred and prepped with ARP main studs and brass freeze plugs. Larry Long from Arrowhead Automotive did assembly circa 2002.
Kauffman Racing Equipment (KRE) aluminum heads with Ferrea 6000 series SS valves, Comp 914 valve springs, Heart shaped combustion chamber volume approx. 70CC. Intake ports smoothed and blended to Felpro 1233 RA-4 intake gaskets. Installed with ROL MLI gaskets (spare gaskets, springs, locks, retainers, valve seals included) and ARP Head Bolts. I had shop install Heli-Coil inserts on exhaust mounting and rocker stud mounting holes as these are easy to strip on alum. After talking to Jeff Kauffman I think they do all their heads this way now. Spark plugs are NGK-R5671A-8. Tighten 1/2 turn past fully seated. I apply a very thin coat of copper never-seize on threads. Good practice to allow engine to cool before changing plugs.
Custom Diamond Racing forged pistons (attachment) with approx 25cc dish. Zero decked to block for 10.5:1 CR.
CAT Forged H-beam connecting rods with ARP bolts, floating wrist pins. (attachment)
Comp Cams HR288 roller camshaft ground on 112 degree LSA, Installed at 109 degree ICL. Duration at 0.050″ is 236 intake/ 242 exhaust. Advertised lift with 1.5:1 rockers is 0.520″ intake / 0.540″ exhaust. (attached cam card) Lift with installed Harland-Sharp 1.65:1 roller rockers is 0.572″ intake / 0.594″ exhaust. Note: Installed preload of lifters is 1/2 turn past zero lash when cam is on base circle (see cam install info card)
CAT SFI Rated Harmonic Balancer, Trick-Flow pushrods, Crane Hydraulic Roller Lifters (the good ones)
Current installed intake is a Holley Street Dominator single plane ported and blended to the Felpro 1233 intake gaskets. Intake has been cut from water crossover to allow removal without having to drain radiator and provide better port alignment. Note there is a 1″ spacer installed underneath carb which supposedly helps fuel distribution. A shorter spacer would give you more shaker clearance. Cliff Ruggles has successfully ported factory iron manifolds to flow as well as the Edelbrock RPM. I just prefer aluminum to match the heads!
Milodon 31660 Road Race oil pan and 18525 oil pickup. This is a VERY nice piece, has baffles to prevent oil starvation on hard cornering. Pan was powder-coated before installation (along with timing cover and intake manifold) Oil capacity with filter change is approx. 7qts. Mobil1 5w40 synthetic oil recommended. Dipstick is a bit fiddly to access due to headers and braces, no big deal..
Oil filter Purolator Boss PBL25288. Oil filter CAN be removed by turning it on side and wiggling out between header and bellhousing. It’s tight but it WILL come out without loosening header bolts. Plus the headers seal perfectly for going on 15 years so don’t mess with success.
Rear main seal is from BOP Engineering: https://www.bopengineering.com/pontiac_engine_acc.shtml This is a superb solution for a very common leak area. Key to success is following install procedures to the letter. Wade Congdon at BOP is a super smart guy and has always been willing to share his knowledge. Car also has their Composite Distributor Gear installed (0.491″ dia for HEI) and has been flawless for 10 years. Since the Comp Cam is a billet piece, they recommend not using the stock iron dist gear and use a bronze one instead. When BOP developed the composite piece it was a game-changer.
Distributor is a Pertronix FlameThrower with a clear HEI cap and Factory Pontiac weights, springs, and center-plate. The factory pieces were quality hardened steel and with an occasional tiny dab of grease will last forever. Dizzy was set up with assistance from Performance Years forum member SunTuned. Total advance is limited to 18 degrees at around 3600 rpm. Initial timing should be set to 12-14 degrees (engine warm at idle, vac advance disconnected) This provides TOTAL timing of 30-32 degrees (vac advance is not a factor in total timing). This is considered a reliable conservative tune. I typically keep the initial timing closer to 12 unless I am going to the strip with 93 octane. Never had a hint of pinging. The Crane adjustable vacuum advance is set to provide 12-14 degrees of cruise timing which every street Pontiac should have for efficiency. It is connected to a ported vacuum source on carb just as factory did. An MSD Soft-touch Rev Limiter is also installed on passenger side of firewall. All performance stick cars should have this along with the SFI rated Lakewood bellhousing (scattershield). The reasons should be obvious! On the bottom side of the rev limiter you will see a little white ‘pill’ which can be unplugged and changed. The one installed is 6000 rpm.
FUEL SYSTEM:
Carb is a 78 Pontiac Quadrajet tuned using the excellent parts and book from Cliff Ruggles https://cliffshighperformance.com/. He is the leading expert on these carbs and Pontiac engine tuning. Fuel tank is a Tanks Inc which appears stock on outside but has modern baffling inside to prevent fuel slosh during cornering. Fuel pump is their GPA-4 Walbro module installed in tank like modern vehicles. Fuel sender is the floatless type that gives steady readings. See the chart I provided to show gallons compared to fuel gauge reading. Fuel filter is a Holley billet alum with replaceable fuel elements. Fuel regulator is a return-style Aeromotive unit also top-notch. Fuel pressure for the Q-jet is set right around 5 psi which provides steady fuel supply. Fuel supply and return lines are Aeroquip SS braided Teflon high pressure hose and fittings(1/2″, -8 AN size) These are far superior to the old rubber braided hose which would harden over time and make your garage smell like gas. According to Tanks Inc, the fuel system as installed is capable of supporting up to 630 HP so ‘Do it right, do it once..’
If you look where the stock oil filter resides on the engine, you will see the standard oil pressure sender for the gauge and a second sender with 3 wires. What the heck is that? It is a Holley 12-810 Fuel Pressure Safety Switch. If the oil pressure fell below 5 psi, it shuts off power to the fuel pump. Must have safety device for many reasons. The three wires are as follows: One provides voltage to the relay mounted above the heater box when key is cranking engine during start, the second provides voltage to the pump while engine is running UNLESS oil pressure drops below 5 psi, the third is the common wire.
DRIVELINE:
Clutch is a SPEC Stage 3 unit and probably the only brand I would run. I had issues with Centerforce and even RAM. https://specclutch.com/products/#performance-clutches Flywheel is a Hayes Billet SFI rated Neutral Balance with ARP bolts. Lakewood SFI rated bellhousing, Tremec TKO-600 Transmission with 0.64:1 5th gear. Transmission was freshened up around 2014 and a White Lightning shifter was installed. Need to drop crossmember and lower trans to replace shifter. Use a bit of Loc-Tite on shifter mounting bolts, they came loose on me once!
Driveshaft is a Ford Motorsports 3.5″ aluminum piece that my transmission guy told me happened to be the exact length needed. Only thing required was conversion u-joints to mate with the yoke on the rear. A PTFB.com driveshaft safety loop is installed. Use ONLY GM Synchromesh fluid in the trans!
Rear end is a GM 10 bolt set up with 3.732 gears by Henderson Driveline with an Eaton posi-unit and Superior Axles. Plenty stout and trouble-free. Leaf spring mounting pads were beefed-up and reinforced. Note wheel studs were upgraded to 1/2″ long reach and take a 13/16″ deepwell socket. Fronts are 12mm/1.5 pitch and take a 19mm (or 3/4″) socket. More on that in brakes section!
BRAKING SYSTEM:
Front brakes are EBC C5 Corvette Rotors and GM 4th Gen Firebird/Camaro Calipers. Car stops amazing. Kit from here: https://customworksperformance.net/index.html Basically you use the stock spindles modified with an adaptor plate to allow mounting of the 4th Gen calipers. The hubs provided in the kit allow the massive Vette rotors to be installed. After talking to Keith at Custom Works a bit, I was able to determine that the hubs he provided are 3rd Gen Firebird/Camaro pieces with the brake rotor part machined off on a lathe. SO aside from that and the mounting bracket, all brake components are GM. Cool.
Rear brakes are a conversion kit I got online years ago. Basically they use 1979 Seville/Eldorado calipers and 79-81 WS6 rotors. I recall rotors had to be reduced in diameter about 0.150″ to clear mounting bolts but not a big deal. Getting the E-brake linkage connected was a bit fiddly but it works fine. I make it a habit of using the E-brake everytime I park the car as these calipers have a history of being wonky if not used all the time. Also I flush brakes every 2-3 years. Good practice for ANY car. Use Dot4 fluid.
Master cylinder and booster were sourced new from Rock Auto and are 79-81 T/A WS6 4 wheel disc specific pieces. This later booster was smaller in diameter and was a dual-diaphragm type with was superior to earlier ones. A new 4 wheel disc prop valve was sourced from Year One. This conversion was done way back in 2005 timeframe so some details are fuzzy but I recall the only issue I had was the rear discs would not fully release causing excessive rear brake drag. As I recall the solution provided by Scarebird.com was that some of these master cylinders came with a ‘holdover valve’ in the circuit going to rear brakes. Simple fix and never had other issues. If the M/C is ever replaced, have your mechanic just set up new one identical to old one. Disclaimer: this is not advice, just recalling what worked on the car. The braking performance should speak for itself.
As mentioned earlier, the 3rd Gen hubs used Metric Lugs. Not a big deal. A 1/8″ wheel spacer was required for the current wheels to clear the calipers. I used quality billet aluminum pieces for this. Note the front calipers have custom aluminum covers installed to improve the look. Details make the difference!
SUSPENSION:
Global West upper and lower control arms with 0.5″ taller upper ball joints for improved Camber curve. Bushings are all GW Delrin with greaseable zerk fittings. All front suspension components are new as of 2020. Front coil springs are from Keith at Custom Works. http://www.pro-touringf-body.com/ provided the front sway bar brace (wonderbar) , the front G-Braces, the driveshaft safety loop, and the front leaf-spring mounting brackets which have the Herb Adams anti-squat mod built in. I supplied you with original suspension components. The subframe connectors and rear leaf springs are also Global West. The rear leaf shackles are GW pieces as well with Delrin upper bushings and factory rubber lower bushings. Front leaf springs are also new factory rubber. This provides the best balance of handling and ride quality. Front sway bar is stock WS6 and rear is Addco one size larger than stock. Shocks are Viking Performance double adjustable and are amazing!
Exhaust System:
Hooker Super-Competition ceramic coated headers with 1.75″ primaries and 3″ collectors going into a Hedman 3″ X-pipe. X-pipe is removeable to access transmission for service. Mufflers are 3″ Dynomax Ultraflows going into 3″ Torque-Tech mandrel bent tailpipes and 3.5″ SS exhaust tips. Overbuilt system but that seems to be the trend here. Exhaust sound speaks for itself..
INTERIOR:
Stereo is a Pioneer head unit, Pioneer front speakers under dash and Rockford Fosgate rear speakers powered by trunk mounted amp. Keep in mind this was installed in early 2000’s when CD’s were still a thing! That said the system does sound really good IMHO. The head unit does have an AUX input with RCA connectors in back so you COULD buy an inexpensive bluetooth receiver on Amazon and stream from your phone. The head unit does have one quirk: Anytime the battery is disconnected, the output to the trunk amp reverts to ‘Subwoofer’ Mode. When you turn on the radio you will wonder why it sounds like it is playing underwater and where the heck did the treble go? Simple fix: with ignition in ACC position and stereo OFF, hold down the FUNCTION button on lower right of the head unit for about 3 secs until it BEEPS. Then press it again along with the arrow pad button until you get to ‘R-Speak’ menu. From there you will eventually find the ‘P/A OUT’ menu and toggle up/down to change from ‘SW’ to ‘FULL’. Good to rock out again! Check the Pioneer manual for better instructions as this is going from memory..
As mentioned earlier, the cig lighter is a fuel pump kill switch and can’t be used for a power source. If you reach up on pass side of console next to stereo I believe you will find a white braided cable tucked up in there. This is for an auxillary usb power source that I had planned on installing in console or glove box. Never got around to it!
Seats are from a 1997 T/A and I think they are a good fit and comfortable. The rear seatback had to be widened a bit so I used Lehmann Brothers Upholstery in Wadsworth to do that. Great work!
Steering Column is from a 79 T/A. the original tilt column was worn out and sloppy so I just swapped in that one 20 years ago. Note it has the hi-beam selector on the turn signal rather than on the floor like original 78 did. Wheel and door sill plates were replaced with Classic Industries pieces about 10 yrs ago.
Door panels are from a 77 T/A. I always liked them better and since I changed the interior color from Tan to Black 20 years ago it just seemed right at the time..
160 Speedo is from a 74 T/A. Original was getting erratic and wonky. Note that all the instrument needles are easy to read orange. This was done with florescent paint and a tiny artists brush. I think it really makes a difference! All dash lights were replaced with LED’s along with rear tail lights. Front Halogen headlights are equipped with a relay that takes power directly from battery (fused). Much brighter and does not draw excess current from headlight switch anymore which was always a flaw with these cars.
SOURCES:
http://www.pro-touringf-body.com/
https://scarebird.com
https://lab-14.myshopify.com/
https://customworksperformance.net/index.html
https://www.tanksinc.com/index.cfm
https://www.bopengineering.com/
https://butlerperformance.com/
http://www.krepower.com/
https://forums.maxperformanceinc.com/forums/index.php
https://www.78ta.com/
CALL DAN AT 513-256-5543 WITH ANY QUESTIONS ON THIS VEHICLE